
$10.00
Add to Cart
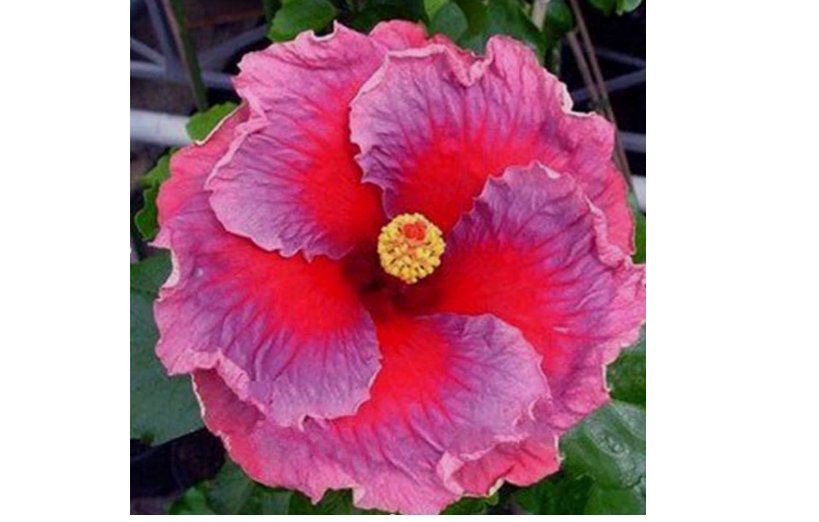
Violet Red HIBISCUS flower exotic garden/house plant 20 Seeds
More than 10 available
Details
Shipping: US-Mainland: $4.00 (more destinations)
Condition: Brand new
Returns: 7 days, seller pays return shipping (more)


Germinating hibiscus seeds can be a rewarding but somewhat challenging process. Hibiscus seeds often have a hard outer coat that can be difficult to penetrate. Here's a step-by-step guide on how to germinate hibiscus seeds:
1. Seed Collection: Collect mature hibiscus seeds from a healthy plant. Wait until the seed pods have turned brown and start to split open. Harvest the seeds before they fall out naturally.
2. Seed Preparation:
o Scarification: Many hibiscus seeds have a hard seed coat that can inhibit germination. To break this dormancy, you can scarify the seeds by gently scratching or nicking the seed coat with a nail file or sandpaper. This helps water penetrate the seed coat.
o Soaking: After scarification, you can soak the seeds in warm water for 24 hours. This will further soften the seed coat and promote germination.
3. Planting:
o Fill small pots or seed trays with a well-draining seed-starting mix.
o Plant the scarified and soaked seeds about 1/4 inch deep in the soil. You can plant multiple seeds in each pot or tray.
o Cover the seeds with a thin layer of soil and gently press down to ensure good seed-to-soil contact.
4. Temperature and Light:
o Place the pots or trays in a warm location with temperatures between 70-80°F (21-27°C).
o Provide bright, indirect light to the seeds. Avoid direct sunlight, which can be too harsh for young seedlings.
5. Moisture:
o Keep the soil consistently moist but not waterlogged. Use a spray bottle to mist the soil surface to maintain moisture levels without disturbing the seeds.
6. Germination Time:
o Hibiscus seeds can be slow to germinate, and it may take several weeks to a couple of months for them to sprout. Be patient and maintain the appropriate conditions.
7. Transplanting:
o Once the seedlings have developed several true leaves and are large enough to handle, transplant them into individual pots or into the garden if the weather is suitable.
o Be gentle when transplanting to avoid damaging the fragile roots.
8. Caring for Seedlings:
o Provide well-draining soil and a suitable environment for young hibiscus plants, including appropriate watering and fertilization.
o Harden off the seedlings before transplanting them into the garden by gradually exposing them to outdoor conditions.
1. Seed Collection: Collect mature hibiscus seeds from a healthy plant. Wait until the seed pods have turned brown and start to split open. Harvest the seeds before they fall out naturally.
2. Seed Preparation:
o Scarification: Many hibiscus seeds have a hard seed coat that can inhibit germination. To break this dormancy, you can scarify the seeds by gently scratching or nicking the seed coat with a nail file or sandpaper. This helps water penetrate the seed coat.
o Soaking: After scarification, you can soak the seeds in warm water for 24 hours. This will further soften the seed coat and promote germination.
3. Planting:
o Fill small pots or seed trays with a well-draining seed-starting mix.
o Plant the scarified and soaked seeds about 1/4 inch deep in the soil. You can plant multiple seeds in each pot or tray.
o Cover the seeds with a thin layer of soil and gently press down to ensure good seed-to-soil contact.
4. Temperature and Light:
o Place the pots or trays in a warm location with temperatures between 70-80°F (21-27°C).
o Provide bright, indirect light to the seeds. Avoid direct sunlight, which can be too harsh for young seedlings.
5. Moisture:
o Keep the soil consistently moist but not waterlogged. Use a spray bottle to mist the soil surface to maintain moisture levels without disturbing the seeds.
6. Germination Time:
o Hibiscus seeds can be slow to germinate, and it may take several weeks to a couple of months for them to sprout. Be patient and maintain the appropriate conditions.
7. Transplanting:
o Once the seedlings have developed several true leaves and are large enough to handle, transplant them into individual pots or into the garden if the weather is suitable.
o Be gentle when transplanting to avoid damaging the fragile roots.
8. Caring for Seedlings:
o Provide well-draining soil and a suitable environment for young hibiscus plants, including appropriate watering and fertilization.
o Harden off the seedlings before transplanting them into the garden by gradually exposing them to outdoor conditions.


 ID, Jawa Timur
